

Plan pour véhicule Scratch-build
3 participants
Page 1 sur 1
![]()
 Plan pour véhicule Scratch-build
![]() gruntax argonax Lun 20 Avr 2009 - 12:04
gruntax argonax Lun 20 Avr 2009 - 12:04
Salut, je propose aux amateurs de 40K, des plans comme le titre l'indique en Scratch-build, c'est a dire a réaliser soit en carton, soit en carte plastique.
Je vous en mets deux, pour le moment et si vous en voulez de particulier,demandez le moi et si je le trouve, je vous le mets ^^.
Je vous en mets deux, pour le moment et si vous en voulez de particulier,demandez le moi et si je le trouve, je vous le mets ^^.

gruntax argonax- Homme d'arme

- Messages : 28
Date d'inscription : 15/04/2009
Age : 49
Localisation : Périgueux
![]()
![]()
Re: Plan pour véhicule Scratch-build
![]() gruntax argonax Lun 20 Avr 2009 - 12:10
gruntax argonax Lun 20 Avr 2009 - 12:10
Et donc on commence par un Dreadnought.

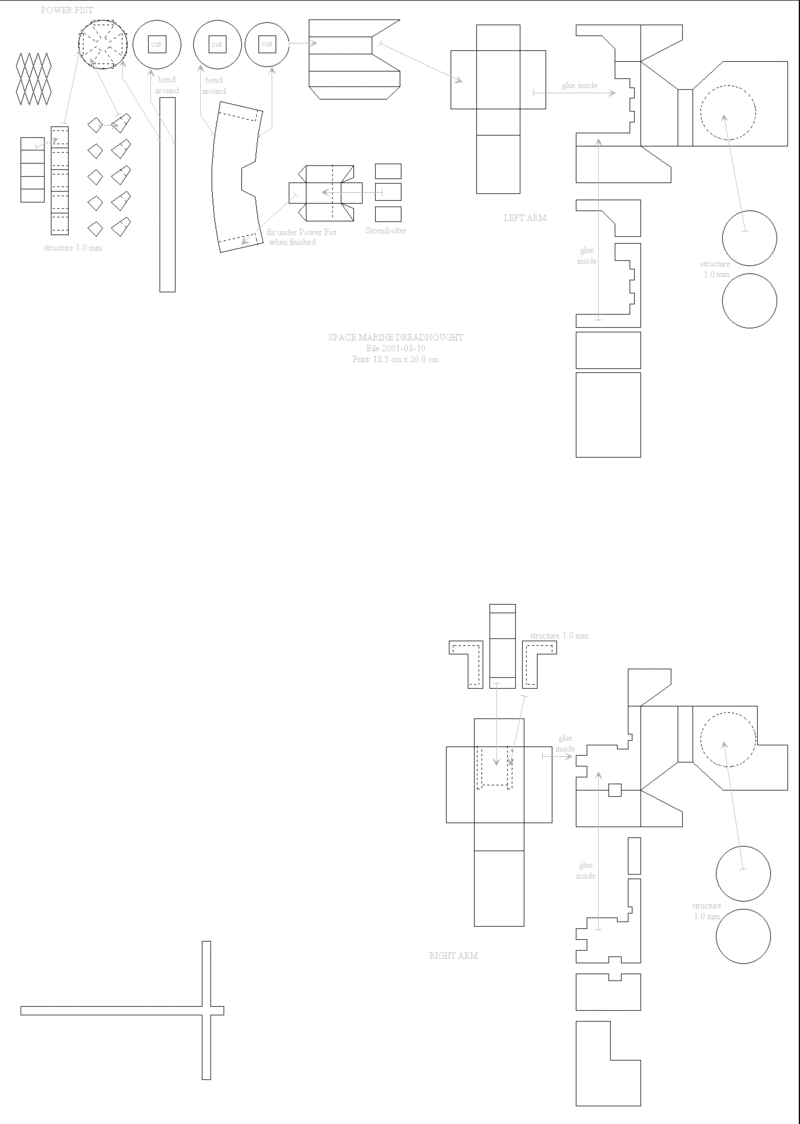
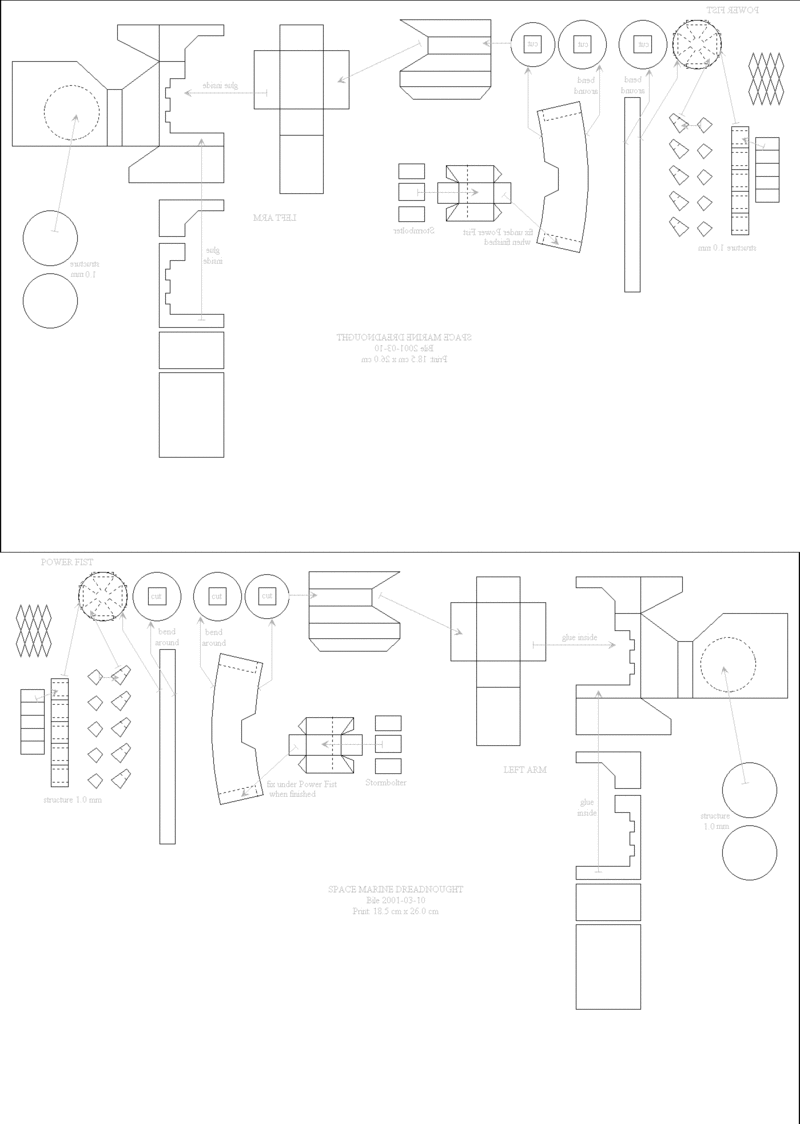
Après soit vous le faite en carton soit et c'est là que cela deviens chaud en carte plastique.
Mais les plans sont a imprimer sur papier 240g/m² format A4 .
Et voici le résultat:

Plan pour Rhino:


Après soit vous le faite en carton soit et c'est là que cela deviens chaud en carte plastique.
Mais les plans sont a imprimer sur papier 240g/m² format A4 .
Et voici le résultat:
Plan pour Rhino:
RHINO MkIIc INSTRUCTIONS:
The templates are designed for use with 0.5 mm thick card. Unless otherwise noted, all structure should be done 1.0 mm thick.
Cut along continuous lines. Scratch and fold "backwards" along the dotted lines. Dotted lines marked with "x" are meant to be scratched on the backside of the card and then folded to the printed side of the paper. Dash and dot lines indicate positions where other parts will be fixed.
Main hull (rhino1.gif; printing size 18.0 x 27.0cm):
Cut out 1A and bend where indicated. Cut out the two small rectangles on the front (windows) and the top hatch. Glue a fitting piece of card from the backside under the opening for the top hatch.
Cut out carefully 1D (windscreen wiper) and glue it on 1C. Then glue this from inside under the window openings.
Now cut and fold 1B and fix it to 1A. Together with the two parts 2 this gives the main section of the Rhino.
Next is the structure 3A to 3D, all done 1mm thick and glued to the hull where indicated. Part 4 (1 or 1.5 mm thick) is glued over the windows.
5B is glued on 5A (both 0.5 mm thick) and this fixed in the matching gaps in the structure 3B.
Bolter:
Cut out 6a (1 or 1.5mm thick). There are three different 6a's, depending if you want the Bolter point forward, down or up. Next do 6b and glue it centric on 6a.
Two layers of structure are fixed on 6b: 6c and 6d (both 0.5mm thick).
If you work accurate enough, you should get a small gap along the left and right top edges. Carefully fill them with some Green Stuff or Fine Filler to create tiny 45 degree flattenings.
Cut out 6e (twice) and 6f and glue them together as indicated to create the ammo boxes (one for each side).
Left track section (rhino2.gif; printing size 18.0 x 27.0cm):
Cut out 1A and glue a small piece of card on the backside to close the three ventilation openings.
1B and 1C completes the basic shape. Before you fix 1B, cut a 1.2 mm broad strip of card, fold it and glue it inside to give the track section more strength.
Do 2A and 2B as 1.0 mm structure and glue it toward 1A and 1B as indicated. 2C and 2D (1.0 mm) are fixed on the front and rear of 1C.
The door 3A is done 1 mm thick and fixed to the track section. The parts 3B (1mm) are glued in the notches in 3A, the parts 3C (1.5mm thick) on 3B where indicated.
Cut and fold 4 to form the engine exhausts.
5A (0.5mm) is covered with the structure 5B (1.0mm) and glued to the front (on 2D).
Cut out 6A (0.5 or better 1.0 mm thick). Fold the wheels 90° backwards. Now glue this on the bottom side of the track section. Note that the correct position is not in the centre but more towards the main hull.
Add 6B and 6C. Cut and fold 6D. Glue always one between two opposite wheels so that the wheels are fixed.
Cut 6E (1.0 mm thick). Add the structure 6F (1.5 mm) on the backside and 6G (0.5mm) on the front and fix them so that the 6F's lie in between the wheels.
gruntax argonax- Homme d'arme
- Messages : 28
Date d'inscription : 15/04/2009
Age : 49
Localisation : Périgueux
![]()
![]()
Re: Plan pour véhicule Scratch-build
![]() T2OIII Lun 20 Avr 2009 - 17:55
T2OIII Lun 20 Avr 2009 - 17:55
La vache c'est énorme ce truc !! 
Trop classe ! Même si je joue pas 40000, je sens que je ne vais pas résister à l'envie de m'en faire un !!
Trop classe ! Même si je joue pas 40000, je sens que je ne vais pas résister à l'envie de m'en faire un !!

T2OIII- Commandant
- Messages : 69
Date d'inscription : 03/01/2009
Age : 31
Localisation : Saint Léger près Troyes (10) -

![]()
![]()
Re: Plan pour véhicule Scratch-build
![]() gruntax argonax Lun 20 Avr 2009 - 18:32
gruntax argonax Lun 20 Avr 2009 - 18:32
Et encore, t'as rien vue T20, j'ai les plans d'un Titan Imperator, soit a peux près 70 a 80 cm de haut !!
gruntax argonax- Homme d'arme
- Messages : 28
Date d'inscription : 15/04/2009
Age : 49
Localisation : Périgueux
![]()
![]()
Re: Plan pour véhicule Scratch-build
![]() jéjé Mar 21 Avr 2009 - 20:04
jéjé Mar 21 Avr 2009 - 20:04
c'est vrai que c'est vraiment bien !! tout ça avec du cartons !! bon c'est dur qe ça doit pas etre facile mais ça vaut le coup !!
quand j'aurais peind une cinquentaine de figurines j'éssaierais
quand j'aurais peind une cinquentaine de figurines j'éssaierais

jéjé- Commandant
- Messages : 78
Date d'inscription : 02/01/2009
Age : 30
Localisation : saint léger près troyes (10) -
![]()
![]()
Re: Plan pour véhicule Scratch-build
![]() T2OIII Mar 16 Juin 2009 - 18:26
T2OIII Mar 16 Juin 2009 - 18:26
Salut, je t'emprunte l'idée pour la communiquer sur Paint war&more !! 
T2O, toujours bluffé pas ces machins-là !
T2O, toujours bluffé pas ces machins-là !
T2OIII- Commandant
- Messages : 69
Date d'inscription : 03/01/2009
Age : 31
Localisation : Saint Léger près Troyes (10) -
![]()
![]()
Re: Plan pour véhicule Scratch-build
![]() gruntax argonax Mar 16 Juin 2009 - 18:38
gruntax argonax Mar 16 Juin 2009 - 18:38
J'en ai une 50aine environ, donc n'hésite pas tu me dit ce que tu veux et si je l'ai, je te le file...
gruntax argonax- Homme d'arme
- Messages : 28
Date d'inscription : 15/04/2009
Age : 49
Localisation : Périgueux
![]()
![]()
![]()
Page 1 sur 1
Permission de ce forum:
Vous ne pouvez pas répondre aux sujets dans ce forum|
|
|